Saturday 19 January 2013

How I take HDR photos.

I love the HDR effect, especially for the landscape photos. It creates a very dramatic look and all the details are shown in the photo. In fact, landscape photographs are not that easy to be photograph. We always face problems during the shoot.  The most irritating problems I faced every time when I’m shooting landscape photography, is the huge exposure contrast between the sky and the ground. There are many ways to balance out both exposures, such as using filters, exposure blending or using black cards. But for me, I prefer to use the HDR effect. 

So, how I do it? In this post, I will share how I shoot HDR photos. First, we have to know what HDR is. HDR is the short form of High Dynamic Range. HDR photos means there is a higher dynamic range between the darkest points to the lightest point in the photo comparing to the normal photos. Where I'm referring  “normal photos” as single shoot taken from the camera without any presets,  a single exposure photo with a limited contrast range.

Technology now a days, some cameras have a presets in it to capture a HDR photo in single shoot. But for me, my camera does not have that function. In order to complete a HDR shoot, I have to capture the same scene with different exposure settings and merge them in an editing software.

Let’s get started!

First, we have to prepare our equipment. I will need my camera which is the Nikon D700 with a lens and  loaded with battery and memory card. The second thing I need is the tripod. That’s it! I don’t have to bring extra equipment like the filters. Professionals landscape photographers uses those filters, and they have varies type of filters for different situations. The recommend filters, of course is the LEE filters. For my friends from Malaysia, you can purchase the filters from Liewwk

So, when I’m on location, I walk around like everyone does, looking for a spot to shoot. After composition, here comes the trick. First, I use spot metering and meter the lightest area or the darkest area. Get the correct exposure for that, and then I take a photo of it. 

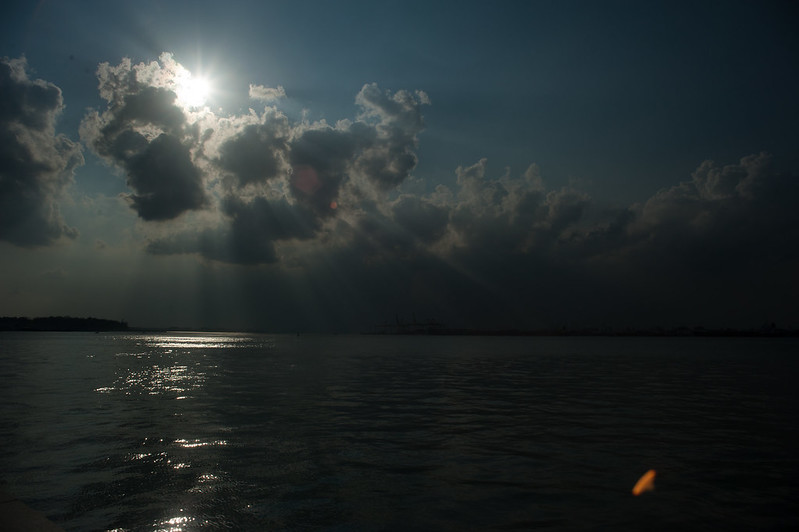
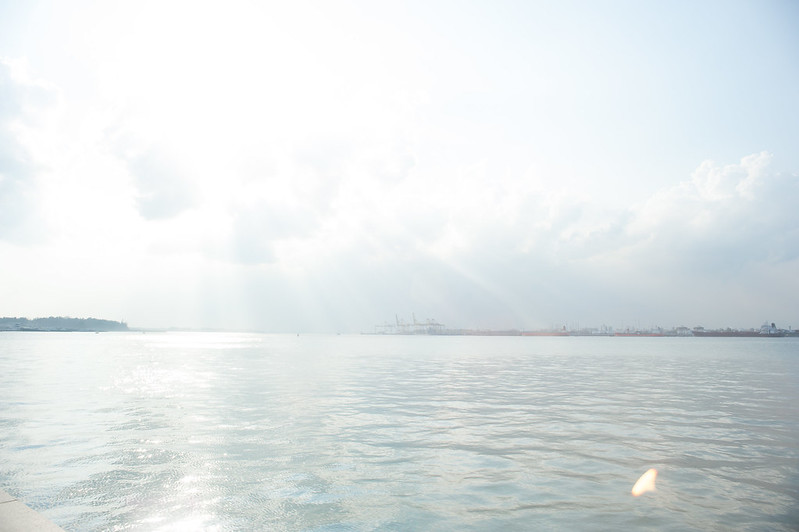
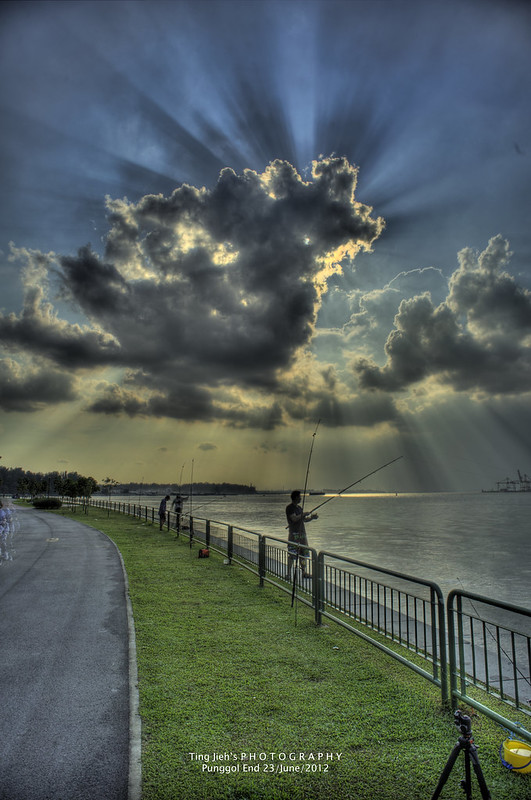
For the example in this post, I meter the clouds which are the area near the sun. Then I set my exposure. The correct exposure in this post means, the exposure that gives me what I want. Take a look at the first photo below. The area I’m shooting is the thin clouds around the sun. I don’t care about anything besides that. I’m not worrying about the clouds that are thicker are under expose or the foreground are very dark. It doesn't  really matter to me. In this first photo, all I want is the thin cloud around the sun to be seen. 

I’m not going to meter the sun, and I don’t mind having an over exposed sun in my photo. There are few reason for that, I will never get the right exposure and see the details in the sun. NEVER! And it is normal to have a sun in a photo without any details in it. It is just too bright to be meter. It damages the sensor. (I feel a bit bad pointing my camera so close to the sun.)

So, I’m done with the first photo. Then I gradually increase or decrease the settings by 1 stop. For this case, I’m in high shutter speed and big f number for the aperture in the first shoot. So, I drop my shutter speed by one stop from 1/8000 to 1/4000. Then I take the second shoot. Then I drop again from 1/4000 to 1/2000 for the third shoot and so on. For this scene, I'm using a manual lens, the vivitar 24mm f2.8 for this shoot.

DSC_2132
First photo: ISO 160 : SP 1/8000 : A f16 (to capture the details of the thin clouds)

DSC_2133
2nd Photo: First photo: ISO 160 : SP 1/4000 : A f16 (Capturing more details in the sky)

DSC_2134
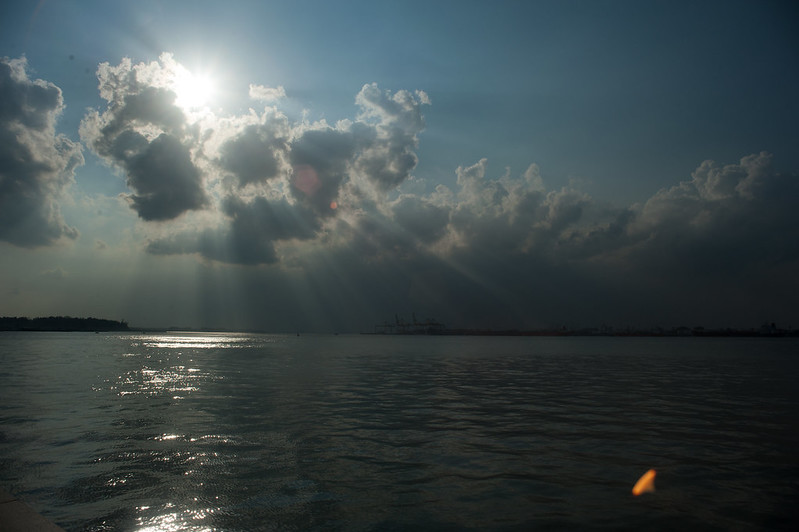
3rd Photo: First photo: ISO 160 : SP 1/2000 : A f16 (Capturing more details in the sky)

DSC_2135
4th Photo: First photo: ISO 160 : SP 1/1000 : A f16 (Capturing more details in the sky)

DSC_2136
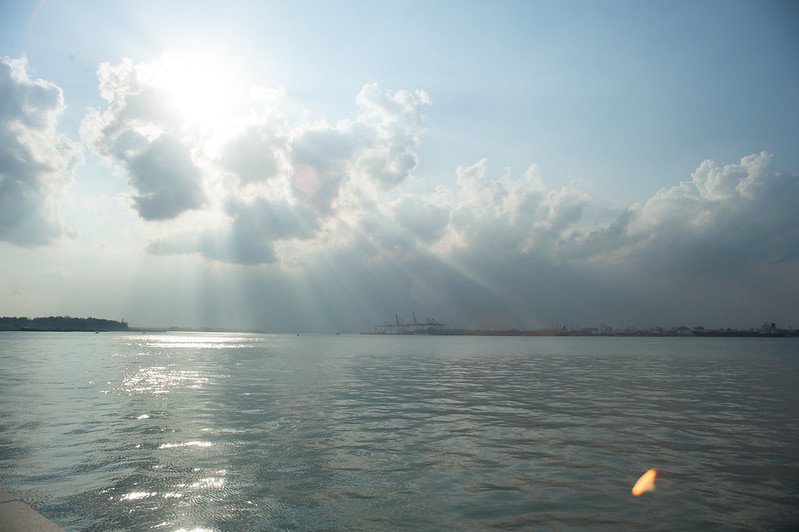
5th Photo: First photo: ISO 160 : SP 1/500 : A f16 (Now we are capturing the mid tones.)

DSC_2137
6th Photo: First photo: ISO 160 : SP 1/250 : A f16 (More details on the sea and the land at the horizon)

DSC_2138
7th Photo: First photo: ISO 160 : SP 1/125 : A f16 (Capturing the details at the dark area. The sea at the bottom right and the land at the horizon)

DSC_2139
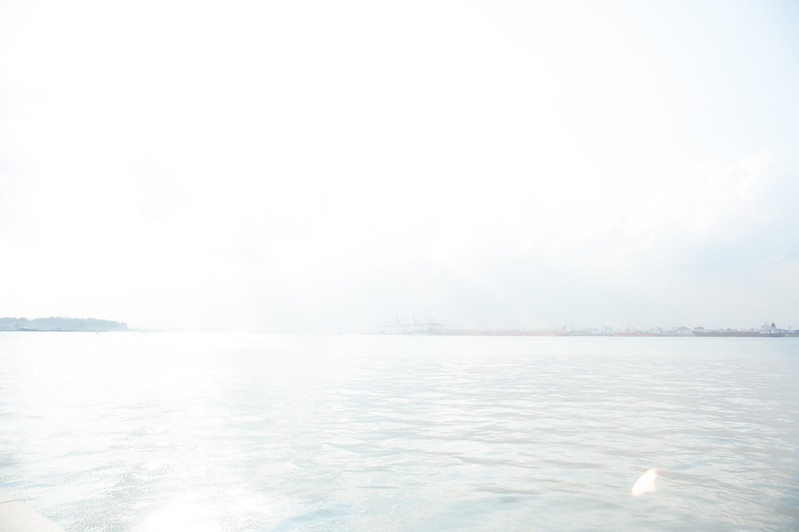
8th Photo: First photo: ISO 160 : SP 1/60 : A f16 (Clearing all the dark area. Show some details on it. It doesnt matter where all other area are over expose, because what I want from this picture is just the two pieces of land at the horizon to be seen)


It doesn't really matter if you control the shutter speed or the aperture first to change the exposure settings. As long as is one stop different, and that is my goal. For depth of field issue, I have no concern about it as my focal point is 
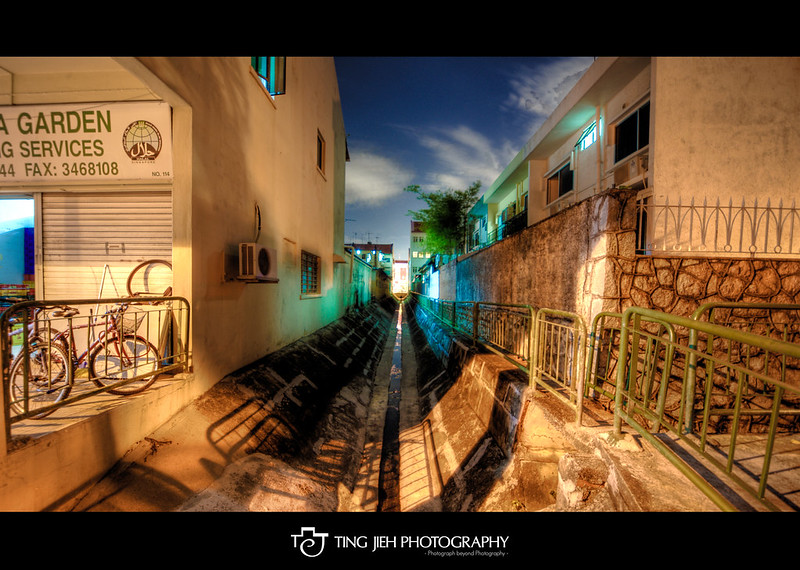
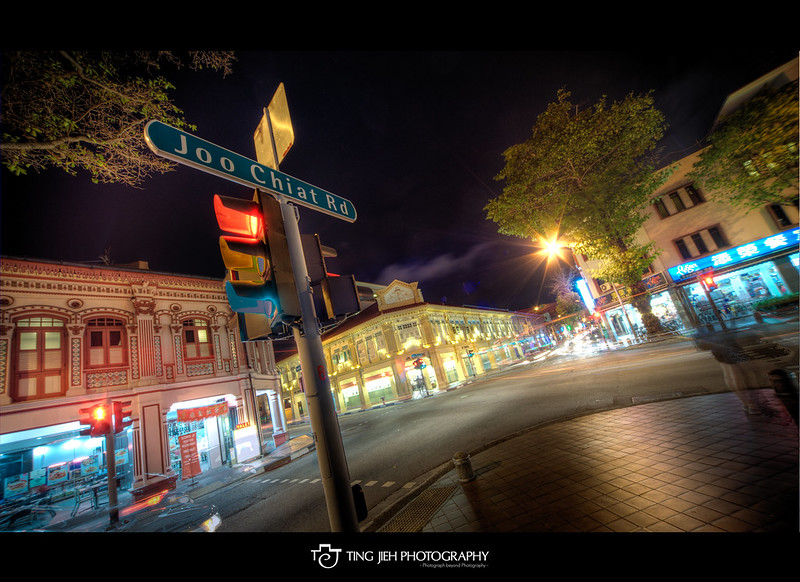
at infinity. The photos shown below, the Joo Chiat series (the HDR photos at night) I change the exposure settings by both aperture and shutter speed. It depends on situation where you need to adjust it by shutter speed or aperture. As long as you get the consistent exposure difference in every shoot. Then the photo should be fine. 

Beside the exposure settings, I use a two second timer to fire the shutter. Just to prevent as much shake as possible. Yeap, I do touch my camera when I’m changing the exposure settings, but small little shake can be fix in the post processing later.

In some camera, you may have a function call “bracketing”. You can use that too! Just set the number of shots that you need and set one stop different for each photos, and that’s it. Just keep pressing the shutter and the camera will do the settings for you.

Let’s get back to the example. I got 8 photos with different exposure in my memory card. Now all I have to do is to merge all of them in post processing. In post processing, there are many software you can use to merge all photos to a HDR photo. I’m using Photomatix for most of my HDR photos. Sometimes I use 
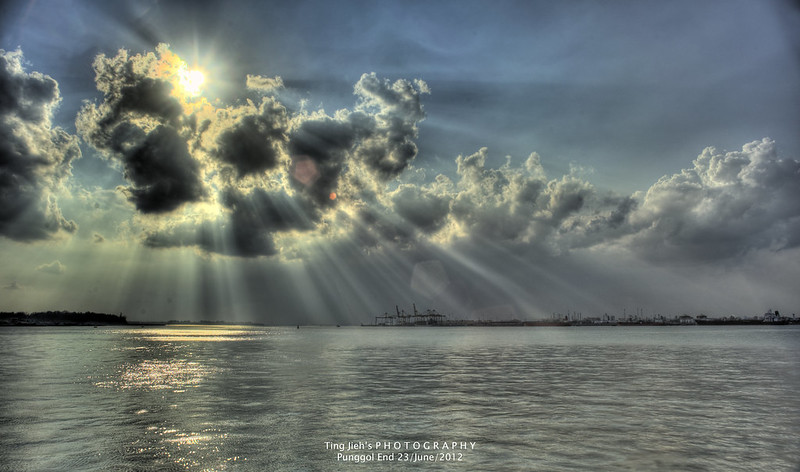
Photoshop. The final touch is to crop it, and clear out the dust. As you can see there are a lot of dust in the photo. There is even a lens flare in it. So I clear all these problems in Photoshop.

All you have to do is just click the “Merge HDR Photo” button, and then select all eight photos in one time and click OK. It will merge all photos you selected into a HDR photo. Play with the settings until you get the effect you like. Then save it and share it!

Here is the final result and some of my work. 

DSC_2132And7more

DSC_2164And8more

DSC_2122And8more

Untitled-2

Untitled-3

Untitled-4

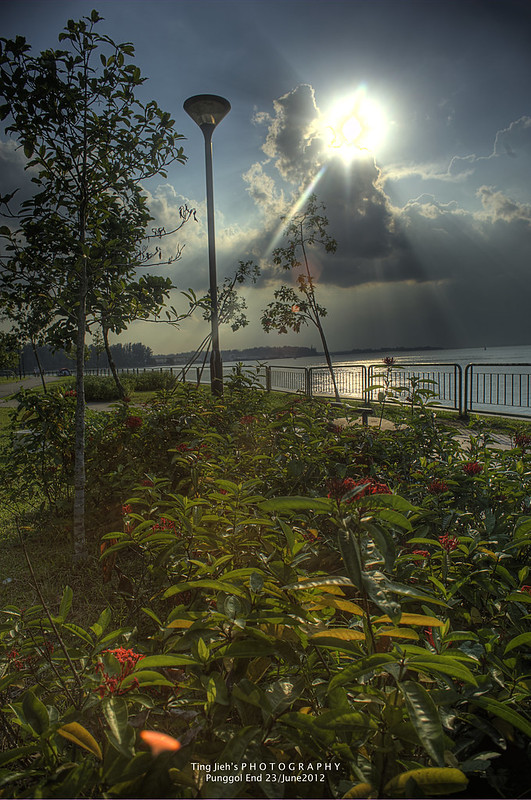
So, I hope you guys now can create your own HDR photos. Do share your HDR photos!

Cheers.

TJ @ Ting Jieh Photograph

Saturday 16 June 2012

Ri Jia Engineering Service Pte Ltd

Gosh, time passed so fast, is June now. A couple of weeks ago, I had a chance to shoot in a servicing and repairing workshop. I'm glad that I have this chance. It was fun and a fantastic experience.

Unfortunately, I picked the wrong timing. I choose to shoot on the Saturday evening. Most of the workers had went back and left only two people working there.

I planned to capture some photos like welding or grinding. Too bad everyone left the company. Well I can't interrupt them by asking them to weld something. They are still busy rushing their job!

I got my D700 with a lens borrowed a Nikon 50mm f1.2 from Robin. Thanks Robin! On the other hand, I got my Vivitar 28mm f2.8 as well. Both are very good lens. Two value buying lens, cheap and nice. Is just that both are manual focus lens, need some time to get use with it.

I have only 1 hour plus to shoot everything. The hardest part is, how many things will they do in this 1 hour?

Well, I got pretty lucky and got these shots.

Edit 2

Safety always comes first. You always need someone to protect everyone safety in the workshop. In here Guan Yin Ma play the main role to protect everyone. 

Edit 3

Ri Jia Engineering Service Pte Ltd is a workshop that service and repairs rotating equipment, such as pump and hydraulic gear. They do provide fabricating services. 

Edit 1

Is drilling time babe~!!! 

Edit 5

Accuracy and precision is very important. In this line, we are talking about 0.001 inch. 

Edit 6

So, do you know which size of drill head are you going to use? 

Edit 7

Does he look like yao ming? He is tall too. Haha...

Edit 8

Finally I took a HDR shoot of the workshop. Ush.... where is my wide angle when I need it!!!!!!!!!

It is so fun shooting there, but have to take care of safety in the workshop. Cannot simply touch the machines or simply walk around. Cranes lifting heavy stuff all the time, and everywhere!

I took off at 5pm when then call it an off for the day. Luckily the boss fetch me to the train station after the shoot. That place is like desert, you can hardly get a bus or Taxi.

I had a fun day! Definitely will do more shoot like this!

Cheers

Ting Jieh

Wednesday 30 November 2011

Walking Tall - My new shoe!

As time passes by, things get older and older. This is the same theory applied to my formal shoes, after serving me for more than 3 years, it time has come. I still like that shoe, but I got no choice. I have to buy a new pair of shoe, else I'll be wearing a spoiled shoes to work.

In the same time, Andrew Chow, a friend of mine introduces me this brand, Walking Tall. Not just a normal leather shoes, but a "high-heal" leather shoes for men!! Without any doubt, I told myself:"I must try this one!"

So I went to their shop at Raffles Place, you can find their details in their FACEBOOK page.

I bought a black one with the shoe lace, and of course it comes along with an additional 1.5 inches height for me! Fantastic, now I'm taller with my new shoes!

Before I wear it to work, I spend a weekend to shoot my new shoe. Here are the photos I got for them. Enjoy!


Side view

A side view of my new shoe. Three exposures in this shoe, can you see it?

Front and Back

45 Degree 

Walking Tall - Getting close

A close-up front view. Looks tall, doesn't it?

Walking tall - Bokehness

Mixing up, and bokeh-ing the back one.

Walking tall

Another close up from front, but this time, I shoot both shoes. I love the shoe lace!

Walking Tall - Close Up

One more close up, bokeh-ing the shoe tips, and focused on the shoe lace. Hmm.. Looks like I like to place the object on the right....have to avoid this next time.

Poster Style

And finally, my favorite photo among all above. I just love this photo! On the other hand, although this is a "High-heal" for men, I still feel it is comfortable to wear.

Now, I'm taller and more confidence than before.

Special thanks to Andrew Chow and Walking Tall.

Cheers,
Lu Ting Jieh


Sunday 13 November 2011

Gatsby - Style as you like~

Rain, rain, rain, come again and again, non-stop raining during this weekend. Ended up I hide myself in my room and take a couple of products shooting.

This post I would like to share a few photos that I took with my roommate's Gastby. XD

Actually I spent two days to shoot these two photos. On the Saturday, I shot the Gatsby's Super Hard Styling Foam (silver colour) and I shoot the Gatsby's Long Keep Wax Spray (black colour) on Sunday.

Gatsby Alone
Gatsby - Super Hard Styling Foam

Gastby - Wax
Gatsby - Long Keep Wax Spray


Regarding to the Super Hard Styling Foam, it is in silver colour, cylindrical shape and very reflective. Not an easy task for me. I used two light sources, left and right each. In between, I used a white cardboard reflector to cover the darker spot on each side. 

Regarding to the Wax Spray, although it is darker in colour, but it is also very reflective. For this object, I change the direction of the source light; I use only single light on top of the object, and three white cardboard reflector. Two reflectors on the left and one on the right.

Spent two days for two photos, that is kinda lame. I got no choice, I'm still in the learning progress. In the same time, I tried to do some editing on the photo. Nothing much, just adding some font on it. Hope you guys like it.

Gatsby - Super Hard Setting


Gastby - Style as you like~


Shot all these photos with my D90 and 50mm f1.8. Attached with an CPL filter. Mounted on tripod, settings around ISO 100, F11 at shutter speed 1/10.

Feel free to give any comments or critics.

Cheers,
Lu Ting Jieh

Tuesday 8 November 2011

Vodka Series


Is been some time I didn't touch my blog, busy for a Convocation Photoshoot, my current job and of course my long wait Mini Studio! RAWR!!! Now I'm back with my mini studio!!

Although it is not fully equip yet, but is good enough to start some small product shooting. Slowly I'll add in more things in future. Here is a photo of all the things that I used to make my own lamp. Yeap, that it is! A light bulb with a aluminium


In this post, I will show you my shots for a bottle of Vodka. Basically this is my setup as shown below. Object in the middle, and two lights at the side. As you can see, the light is diffused with the cotton made oil filter. I kinda like this diffuser, it perform his job by diffusing light, it can hold high temperature and of course it is cheap, $1.50 for a pack, it comes with two pieces in it.


Here, you can see the white backdrop. It is actually a wooden stick on two "stand" that is normally used to hang clothes. Instead of hanging cloths on the stick, I clipped my mahjong paper on it. I used 3 pieces to make sure it looks solid enough. Else you will be able to see through it when the lights are on.

I have my camera mounted on a tripod and a 50mm f1.8 on it. I shoot at ISO 100, Aperture at f11 and shutter speed around 1/30. To make sure the lights does not affect the shoot, I took a pre-shot without any lighting except the natural lights. If the picture is absolutely black in colour, I assume it as the natural light does not affect my photo. Regarding to the white balance, it is pre-adjust before the shoot, with the lights on.

In between the shooting progress, I used two different colour of card board, which is black and white as reflector. Black reflector for white background and white reflector for black background. Here are the results.

brown vodka

For this photo, the black background is not dark enough, that is why it turns a bit brownish. In the future, I will need a 100% black backdrop and a 100% dark room to make a black background shoot.

Absolut Vodka

White background and white object, give a very clean and simple feeling. I feel that it has a classier look than other colour combination. There is a mistake I did in this photo, too dark on the bottle cap and the old man logo. And the reflection is not that nice. I need a better reflective card in the future. The wordings, I just copy from the web. Woops....

In an absolut world


Adjust to a much cooler temperature white balance gives a very icy feeling. I spray some water on it. So it looks icy cold. As it just came out from the fridge.

Enjoy with absolut responsibilities


Placing the object in the center of the frame, create a stronger impact towards the object. It leads the viewer's sight directly to the object then only to the text around it. Meanwhile, there are actually two exposures in this shot. One is the bottle, and the other one is the bottle cap. Then I merge them in post processing.

Vodka 5 in 1


Thinking out of the box, I copy five bottles of Vodka into one single frame instead of only one bottle of Vodka. Then I fill in different colour for each of them. This give you a total different feelings than the previous photos. I feel a bit old school in this photo. You can go to my flickr for a larger view.

I hope you guys like these photos. If you have any suggestion or comments, feel free to post it here. C & C are all welcome. Your feedback is most welcome.

Cheers,
Lu Ting Jieh